Free Ender 3V3 Nebula Camera Mount STL: Download, Print, and Install Guide
Introduction
The Ender 3V3 Nebula Camera Mount STL Free design has become a popular upgrade for 3D printing enthusiasts who want to record or monitor their prints effortlessly. If you own a Creality Ender 3V3 printer and the Nebula camera, you’ve probably realized how tricky it can be to find the perfect angle for recording. Thankfully, creators in the 3D printing community have designed several free STL files you can download and print at home, giving you a custom camera mount that fits perfectly on your printer.
This guide explains everything you need to know about the Ender 3V3 Nebula Camera Mount STL Free options — from what they are, how to download them, the right settings for printing, and how to install them for the best performance.
Understanding the Ender 3V3 and the Nebula Camera
The Ender 3V3 Overview
The Creality Ender 3V3 series (including models like V3, V3 SE, and V3 KE) represents an evolution in affordable, high-quality 3D printers. Known for reliability and smooth performance, the V3 series features CoreXZ motion structure, direct drive extrusion, and fast printing speeds. However, like many desktop 3D printers, it lacks a built-in camera mount — making it difficult to film time-lapses or monitor prints remotely.
The Nebula Camera Explained
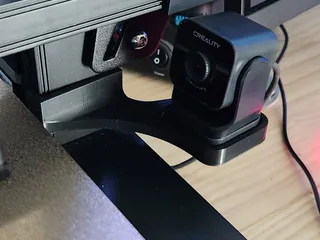
Creality’s Nebula camera is designed to give users a live view of their prints and even record time-lapse footage. It’s compact and integrates perfectly with Creality devices. However, to achieve a stable, clear angle, the camera needs to be securely attached to the printer — that’s where the Ender 3V3 Nebula Camera Mount STL Free design comes into play.
A good mount allows you to:
- Record clear footage of every layer printed.
- Monitor prints remotely with minimal vibration.
- Maintain a tidy, stable setup without interfering with moving parts.
Free STL Mount Designs — What’s Available
The 3D printing community has uploaded several free STL models of the Ender 3V3 Nebula Camera Mount on popular platforms. Below is a table listing some of the best ones:
| Platform | STL Design Name | Printer Compatibility | Features | Link |
|---|---|---|---|---|
| Printables | Nebula Camera Mount in X Axis for Ender 3 V3 KE | Ender 3V3 KE | Sleek design attaches to X-axis | Printables |
| Thingiverse | Ender-3 V3 Z-Axis Nebula Mount | Ender 3V3 | Mounts camera near Z-axis for fixed view | Thingiverse |
| Creality Cloud | Nebula Camera Mount for Ender 3 V3 SE/KE | SE/KE versions | Official design by Creality | Creality Cloud |
| MakerWorld | Ender 3V3 Frame Mount | All V3 series | Adjustable angle mount | MakerWorld |
Each design has slightly different mounting locations and features, so it’s important to choose one that fits your model and preferred camera angle.
Choosing the Right Mount
There are a few types of mounts available for the Ender 3V3 Nebula Camera Mount STL Free:
- X-Axis Mounts: Attach to the print head carriage, giving a direct front view of the print. Great for close-up shots but may move during printing.
- Z-Axis Mounts: Mount on the vertical rail. These offer a stable, fixed perspective.
- Bed-Side Mounts: Provide an angled side view and stay fixed even as the printer moves.
When selecting your STL, ensure it matches your printer’s model (V3, V3 SE, or V3 KE). You can usually find this detail in the STL description or comments.
For material choice, PETG or ABS is preferred over PLA, since they handle vibration and temperature better.
| Material | Pros | Cons |
|---|---|---|
| PLA | Easy to print, smooth finish | Can soften with heat |
| PETG | Strong, flexible, heat-resistant | Slight stringing possible |
| ABS | Very durable | Requires enclosure and ventilation |
How to Download and Print the STL
Step 1: Find and Download the File
Go to websites like Printables, Thingiverse, or Creality Cloud and search for “Ender 3V3 Nebula Camera Mount STL Free.” Click on your chosen model and download the .stl file. Most creators offer these files under a Creative Commons license, meaning you can print for personal use.
Step 2: Slice the Model
Open your slicing software (like Cura or Creality Print) and import the STL. Recommended print settings include:
| Setting | Value |
|---|---|
| Layer Height | 0.2 mm |
| Infill Density | 15–25% |
| Wall Count | 3 |
| Supports | Enabled (as needed) |
| Material | PETG or PLA |
| Bed Temperature | 60–70°C |
Step 3: Print and Post-Process
Once printed, remove any supports gently. You can lightly sand the surface for smoothness. Check screw holes or clip fits before installation.
Installation Guide
Installing your Ender 3V3 Nebula Camera Mount STL Free model is straightforward.
- Locate the Mount Point: Depending on your design, find the spot on your Ender 3V3 where the camera will attach (X-axis, Z-axis, or frame).
- Attach the Bracket: Use screws or clips as specified in the design file. Most models use M3 screws.
- Mount the Camera: Slide or clip the Nebula camera into the printed mount.
- Adjust the Angle: Tilt or rotate to ensure your camera captures the entire print area.
- Secure the Cables: Keep power and data cables tidy using zip ties or cable clips.
After setup, test your camera feed and ensure the image is steady and unobstructed.
Tips & Best Practices
To get the best from your setup:
- Ensure the mount is tightly secured to prevent vibration.
- Use a fixed (non-moving) location if you want stable time-lapse videos.
- Clean the camera lens regularly to avoid blurry images.
- Check that the camera cable doesn’t rub against moving parts.
- Experiment with camera angles for the best lighting and visibility.
Troubleshooting
| Problem | Possible Cause | Solution |
|---|---|---|
| Camera wobbles | Loose mount or low infill | Reprint with 30% infill, tighten screws |
| Camera obstructed | Wrong placement | Move to Z-axis or side frame mount |
| Poor print quality after installation | Mount interfering with motion | Relocate camera or reduce weight on moving parts |
| STL file doesn’t fit | Wrong version (V3 SE/KE) | Recheck model description before printing |
Advanced Modifications
If you like customizing, you can remix the Ender 3V3 Nebula Camera Mount STL Free model using software like Tinkercad or Fusion 360. You can:
- Add a ring light mount for better illumination.
- Modify the tilt angle for different perspectives.
- Combine multiple accessories into one print.
Sharing your remix on platforms like Printables or Thingiverse helps other users improve their setups too.
Conclusion
The Ender 3V3 Nebula Camera Mount STL Free models provide an affordable and practical way to improve your 3D printing experience. With a proper mount, you can record smooth time-lapses, monitor your prints remotely, and enjoy better control over camera angles. Whether you print an official design or a community remix, the installation process is simple, and the benefits are significant.
By selecting the right STL file, using the best print settings, and properly installing the mount, you can enhance your printer’s functionality and your overall workflow.
Frequently Asked Questions
Q1: Can I use these mounts on other Ender printers?
Yes, some STL designs are compatible with other Ender models, but you should check the version details before printing.
Q2: What hardware do I need for mounting?
Most designs use M3 screws, though some models clip directly onto the printer frame without tools.
Q3: Which material is best for the camera mount?
PETG is ideal since it’s durable and slightly flexible, reducing vibration.
Q4: Will this mount interfere with printing?
No, if installed properly. Just ensure the camera doesn’t extend into the print head’s path.
Q5: Can I modify the STL file?
Yes, most creators allow remixing under open-source licenses. Just credit the original designer if you share it online.